How to Add Category Filter to Your Shopify Product or Blog Pages, A Simple Solution
If you're looking to create a more user-friendly shopping or blog experience on your Shopify store, adding a category filter can be an excellent solution. This feature allows your customers to filter products or blog posts by category, making it easier to find what they're looking for. In this tutorial, we will walk you through the steps to create a custom filter section using Shopify's liquid code, and how you can add it to your store to improve the browsing experience.
Step 1: Write the Custom Code for the Category Filter
To begin, you will need to create a custom section in your theme files that includes a category filter. This will allow users to filter products or blog posts based on their categories. Below is the code you'll need to add.
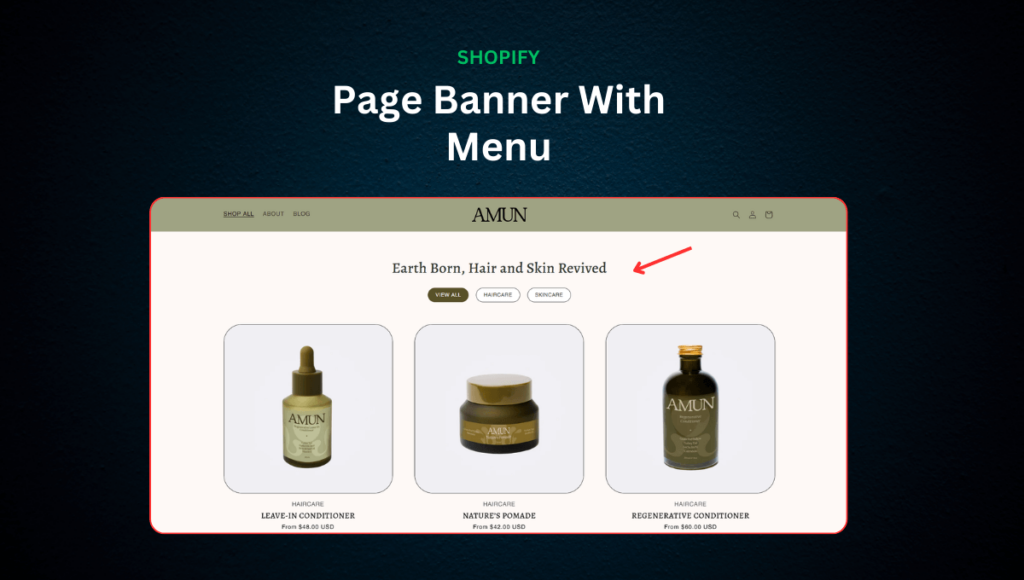
Custom page header with title and menu <div class="section--padding scroll-trigger animate--fade-in"style="background-color: " id="section-"><div class="page-width"><div class="page_header_content_wrapper" style="text-align: ;"><div class="header-content" style="gap: px;"><h1 class="custom_title_page_header_title"><span class="custom-title"><h1 class="custom_title_page_header_title"><span class="custom-title"><div class="custom_paragraph"><div class="page-header-menu desktop-menu"><a href="" class="menu-button active"><span><div class="page-header-menu mobile-menu"><select class="mobile-menu-select" onchange="window.location.href = this.value"><option value=""><option value="" selected><div class="page-header-menu mobile-menu"><a href="" class="menu-button active"><span><p>Please configure a menu in the customizer.<style>.section--padding #section-#section- .page_header_content_wrapper {display: flex;flex-direction: column;align-items: ;}#section- .header-content #section- .header-content p #section- .custom_title_page_header_title#section- .custom_paragraph /* Desktop Menu Styles */#section- .page-header-menu #section- .desktop-menu #section- .desktop-menu span #section- .menu-button #section- .menu-button:hover, #section- .menu-button.active /* Mobile Menu Styles */#section- .mobile-menu #section- .mobile-menu-select /* Tablet Styles */@media screen and (max-width: 989px) {#section- .custom_title_page_header_title {font-size: {{ section.settings.title_font_size_tablet }}px;}#section- .custom_paragraph {font-size: {{ section.settings.paragraph_font_size_tablet }}px;}#section- .menu-button {font-size: {{ section.settings.menu_font_size_tablet }}px;padding: {{ section.settings.menu_padding_vertical_tablet }}px {{ section.settings.menu_padding_horizontal_tablet }}px;}}/* Mobile Styles */@media screen and (max-width: 749px) {#section- .custom_title_page_header_title{font-size: {{ section.settings.title_font_size_mobile }}px;}#section- .custom_paragraph {font-size: {{ section.settings.paragraph_font_size_mobile }}px;}#section- .desktop-menu {display: none;}#section- .mobile-menu {display: block;}#section- .menu-button {font-size: {{ section.settings.menu_font_size_mobile }}px;padding: {{ section.settings.menu_padding_vertical_mobile }}px {{ section.settings.menu_padding_horizontal_mobile }}px;}} |
Step 2: Add the Custom Section to Your Theme
Now that you've written the code for the category filter, it's time to add it to your theme. Follow these steps:
- Go to Your Shopify Dashboard: Log in to your Shopify store's admin panel.
- Navigate to Themes: In the left sidebar, go to
Online Store > Themes. - Edit Your Theme: Click on the
Actionsbutton next to your active theme, and selectEdit Code. - Create a New Section: In the file explorer, go to the
Sectionsfolder and create a new file. Name this file something likecategory-filter.liquid(or any other name you prefer). - Paste the Code: Copy and paste the code you wrote in Step 1 into this newly created section file. Save your changes.
Step 3: Add the Section to Your Shopify Pages
With the section created, you can now add it to your Shopify store pages, including product pages or blog pages.
- Create Menus Using Product or Blog Categories:
- Go to your Shopify Dashboard and create menus using product collections or blog categories.
- If you're adding a filter for products, you can use collections to organize them into categories.
- For blog posts, you can create categories based on your blog tags or other criteria.
- Customize Your Shop or Blog Template:
- In the Shopify Dashboard, go to
Online Store > Themes, and click onCustomize. - Select the template for the page you want to add the filter (e.g., Product Page, Blog Page, or a custom page template).
- In the left sidebar of the theme editor, you should now see an option to add the section you created.
- Add the section to your page, and configure its settings (such as the menu and any other options you want to enable).
- In the Shopify Dashboard, go to
- Set the Menu:
- In the section settings, select the menu you created earlier (e.g., product collections or blog categories).
- Style the filter using available options, such as adjusting padding, font size, colors, and more to match your store's design.
Step 4: Test the Category Filter on Your Store
Once you have configured and styled your category filter, preview the page on your store to see it in action. Ensure that the filter works as expected—products or blog posts should now be easily filterable by category.
Conclusion
By following these steps, you'll have successfully added a category filter to your Shopify store, making it easier for your customers to navigate your products or blog posts. This feature can significantly enhance the user experience on your site, and it's a great way to help users quickly find what they're looking for.
Whether you're building a custom shop page or blog, this simple but effective filter section can give your store a more professional and user-friendly touch. Happy coding!